
Spring gardening is in full swing and we’ve teamed up with our friends at Dunn Lumber to bring you a great DIY building and gardening project you can do at home - no backyard needed!
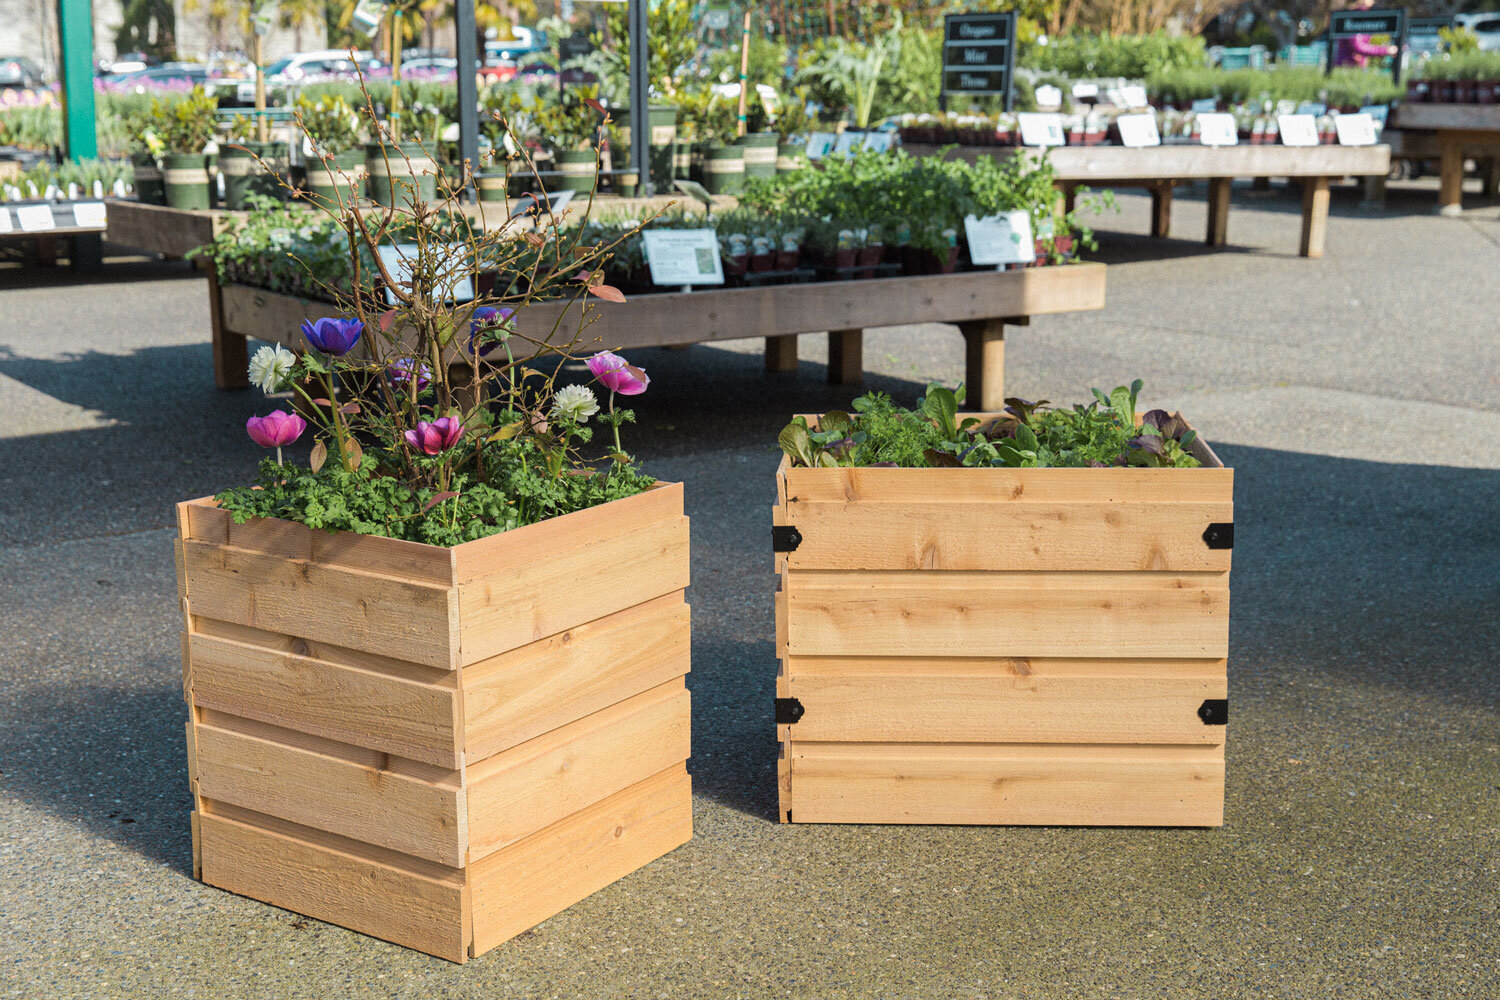
Kirsten Dunn, of the fabulous Dunn DIY blog, decided to build two different-sized cedar planter boxes—18-by-18-inch and 24-by-18-inch—that can fit almost any space. These portable containers work well for edible plants, herbs, flowers, and small shrubs, and can transform the look of a patio or balcony.
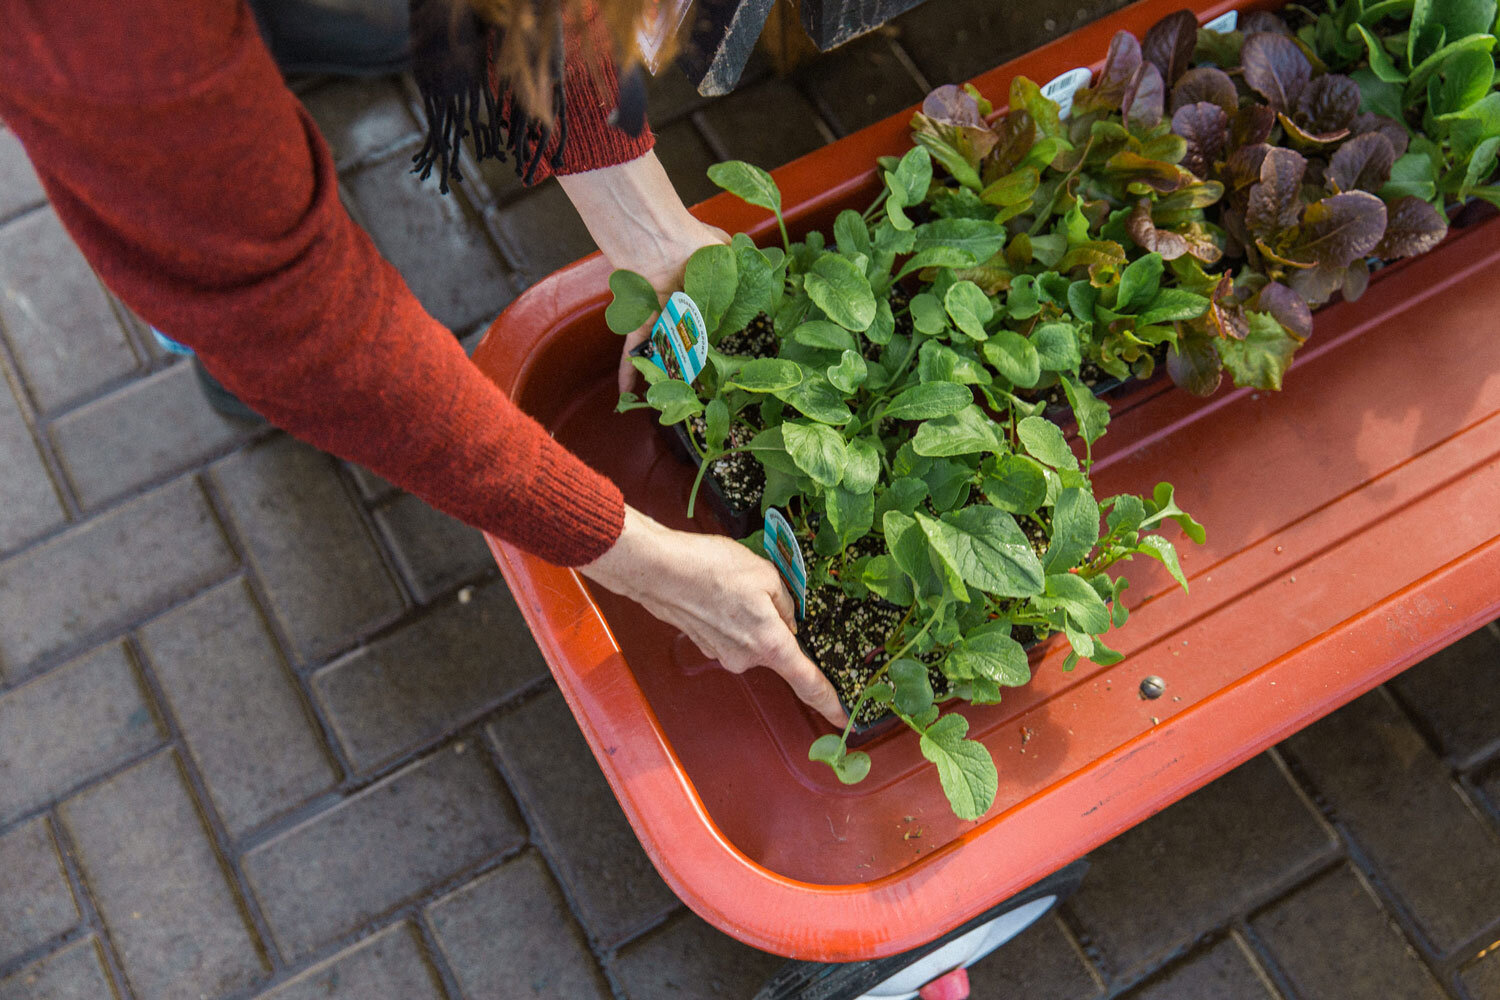
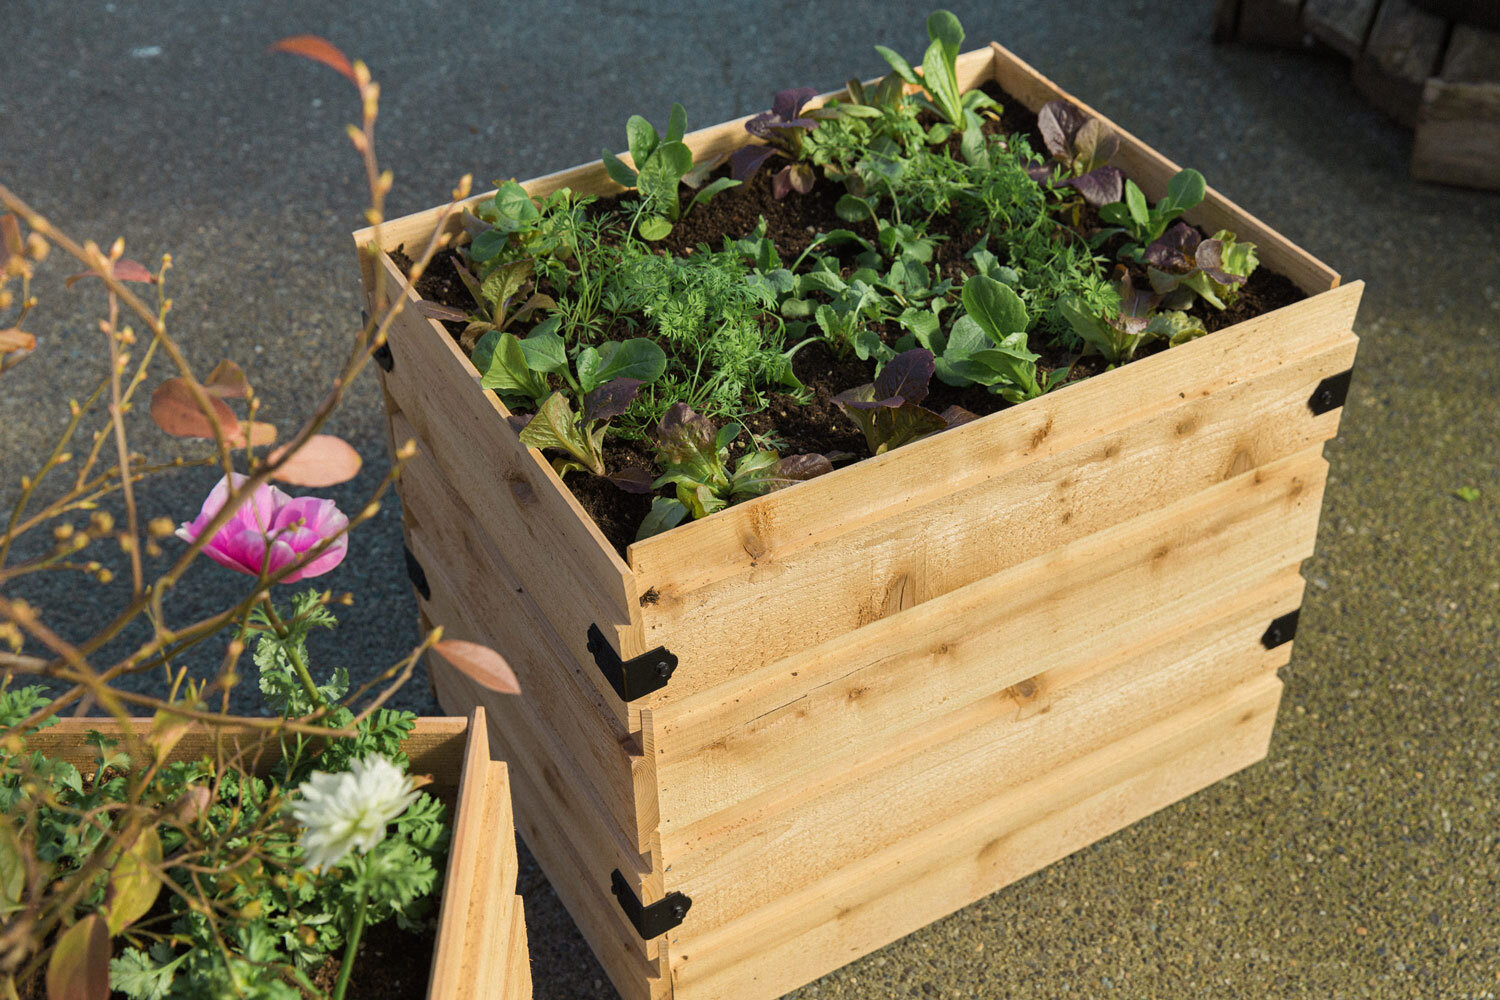
Then, Kirsten and I planned out what she would grow in each container and planted them here at Swansons. For the square planter, we chose a blueberry bush surrounded by spring flowers (we couldn’t resist the gorgeous ranunculus flowers that are in bloom right now). The blueberry will stay in the planter year-round and the flowers can be changed up so there’s something in bloom each season. For the rectangular container, we decided to plant a “salad bar” with lots of scrumptious vegetables for spring and summer (there are lots of other options that would work great, too, as we shall see).
We took lots of photos and notes so we could show you how to create your own beautiful and productive planter boxes at home. If you want to build the planter boxes yourself, check out Kirsten’s blog post: DIY Cedar Planter Boxes.
In this post, I’ll help you decide what to grow in your containers (don’t worry, you can also use store-bought planters; I won’t tell!) with a step-by-step planting guide and gorgeous infographics, too.
Let’s get started!


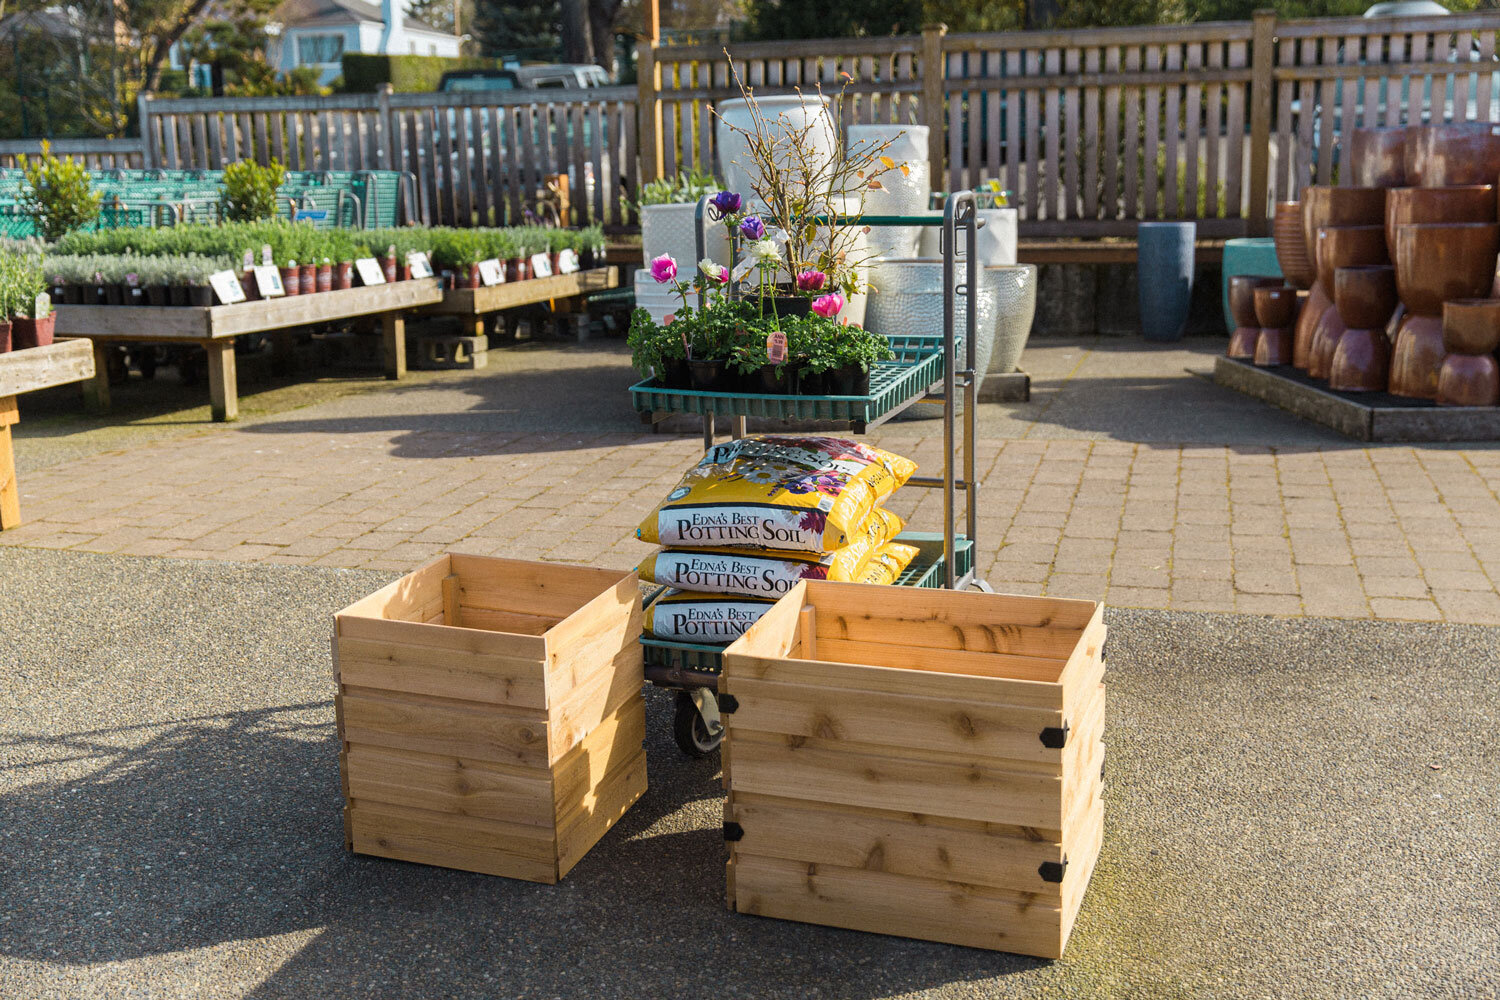
Note: We recommend putting the containers on wheeled stands if you plan on moving them around—they can get very heavy when filled with soil (especially the larger one)!
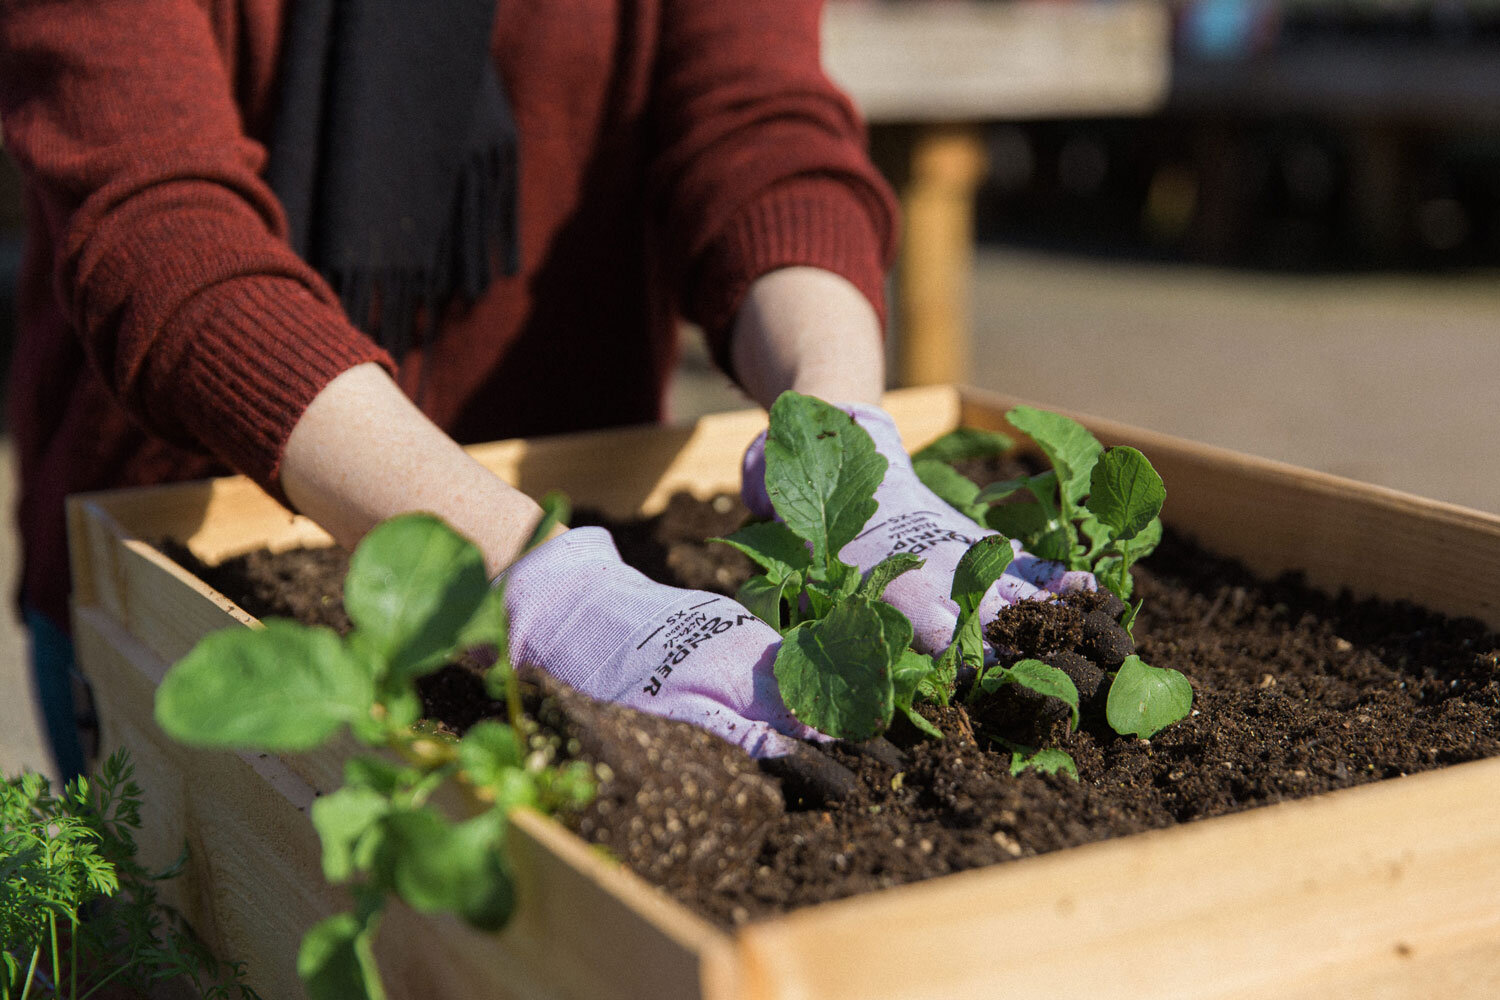
Step 1: Fill your portable container with soil
For any container planting, you’re going to use potting soil. Don’t just grab soil from your yard—it’s too heavy, likely has a lot of clay or rock, and can contain bugs and disease spores. There are a few potting mixes out there specifically for veggies, but we find a regular, quality potting mix is just fine for an edible garden, especially if you also use a natural fertilizer. And don’t use compost alone to fill a container you’re planting in—some edible plants may like the soil that rich, but not all plants do.
Next, choose a fertilizer. At Swansons, we like a natural vegetable and herb fertilizer that you sprinkle on top of the soil, then mix in. You can also get a fertilizer specifically for acid-loving plants, if you’re planning to grow blueberries. We like both Dr. Earth and Espoma brands.
Follow the directions on the fertilizer bag for how much to use per cubic foot and mix it in as you’re planting. You’ll want to add fertilizer every three to six weeks throughout the season because nutrients run through a container more quickly than they do in the ground.
You should fill your containers as fully as possible, about ¼ - ½” from the top. The potting soil will settle as it’s watered, and the plant’s roots need as much space to grow as possible.


Step 2: Choose your plants
Before you choose what to plant, ask yourself the following questions:
Where will you place your containers? How much sun do you have? Are there trees or other tall buildings that will block light? What direction are you facing? Track the light throughout the day in the space you’re planning to put the containers.
For areas with mostly morning sun, stick to leafy greens like kale and lettuce or herbs such as parsley, mint, and cilantro. If you’re looking to plant squash, tomatoes, or peppers, you’ll need at least six to eight hours of sunlight per day, so you’ll need a spot that’s sunny through the afternoon—or the dedication to move the containers around each day to receive optimal light.
How much time do you have to devote to your edible garden? Most edible plants need to stay fairly moist and require watering once to twice daily in the heat of summer. Exceptions are Mediterranean herbs such as rosemary, thyme, and basil.
Most importantly, what kinds of food do you like? Do you want something ornamental as well as edible? Some blueberry bushes have beautiful fall colors, and herbs like rosemary stay green all year long.
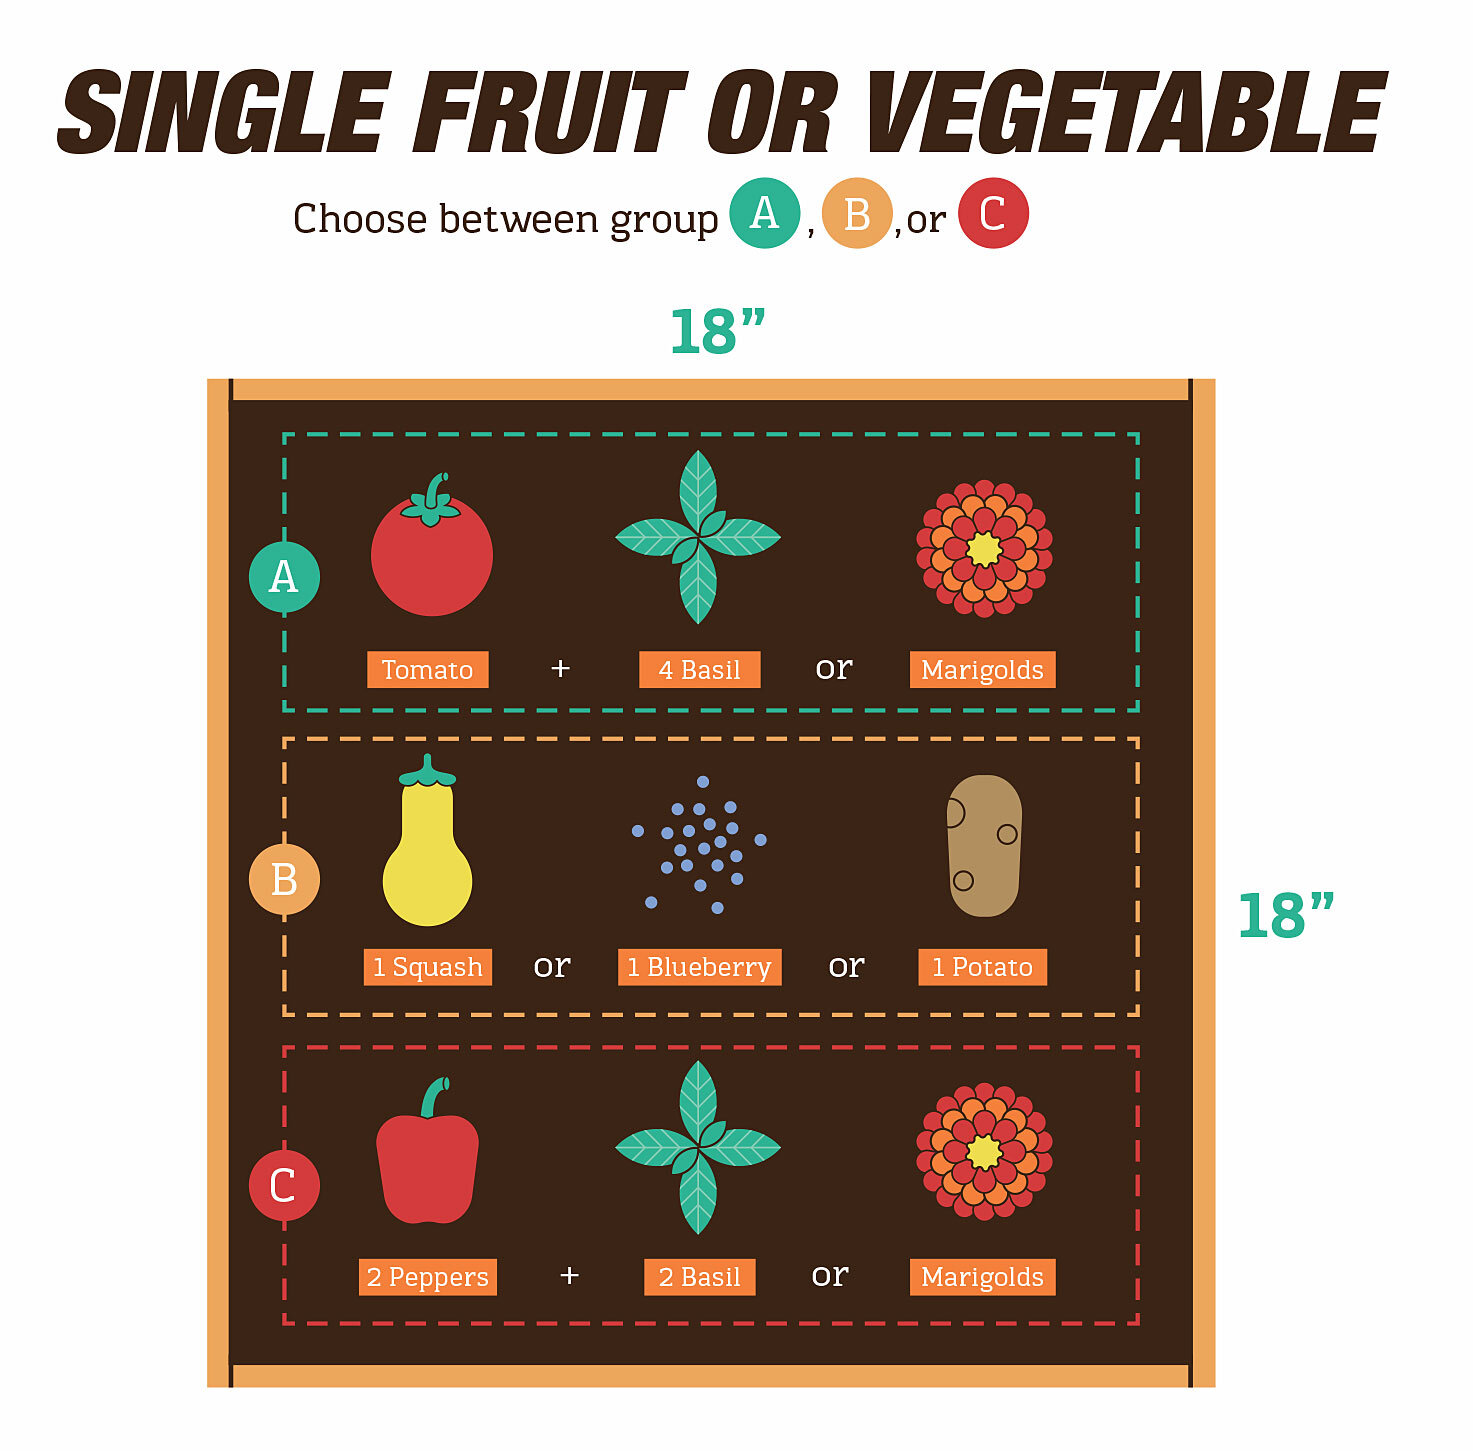
Next, you’ll want to consider the size of your container. For the 18-by-18-inch, it’s best to choose one larger plant because it will grow to take up all that space—think one squash or tomato plant. Or, pick a few smaller plants like herbs and leafy greens and pair them with flowers to attract pollinators.
Potatoes are a fun crop to grow on their own in the 18-by-18-inch container. And although you can plant potatoes from the grocery store, we don’t recommend it unless you know they are organic and know what variety they are. We recommend purchasing spuds from the garden store, then planting them in March and April. Learn more about growing potatoes and other spring vegetables.
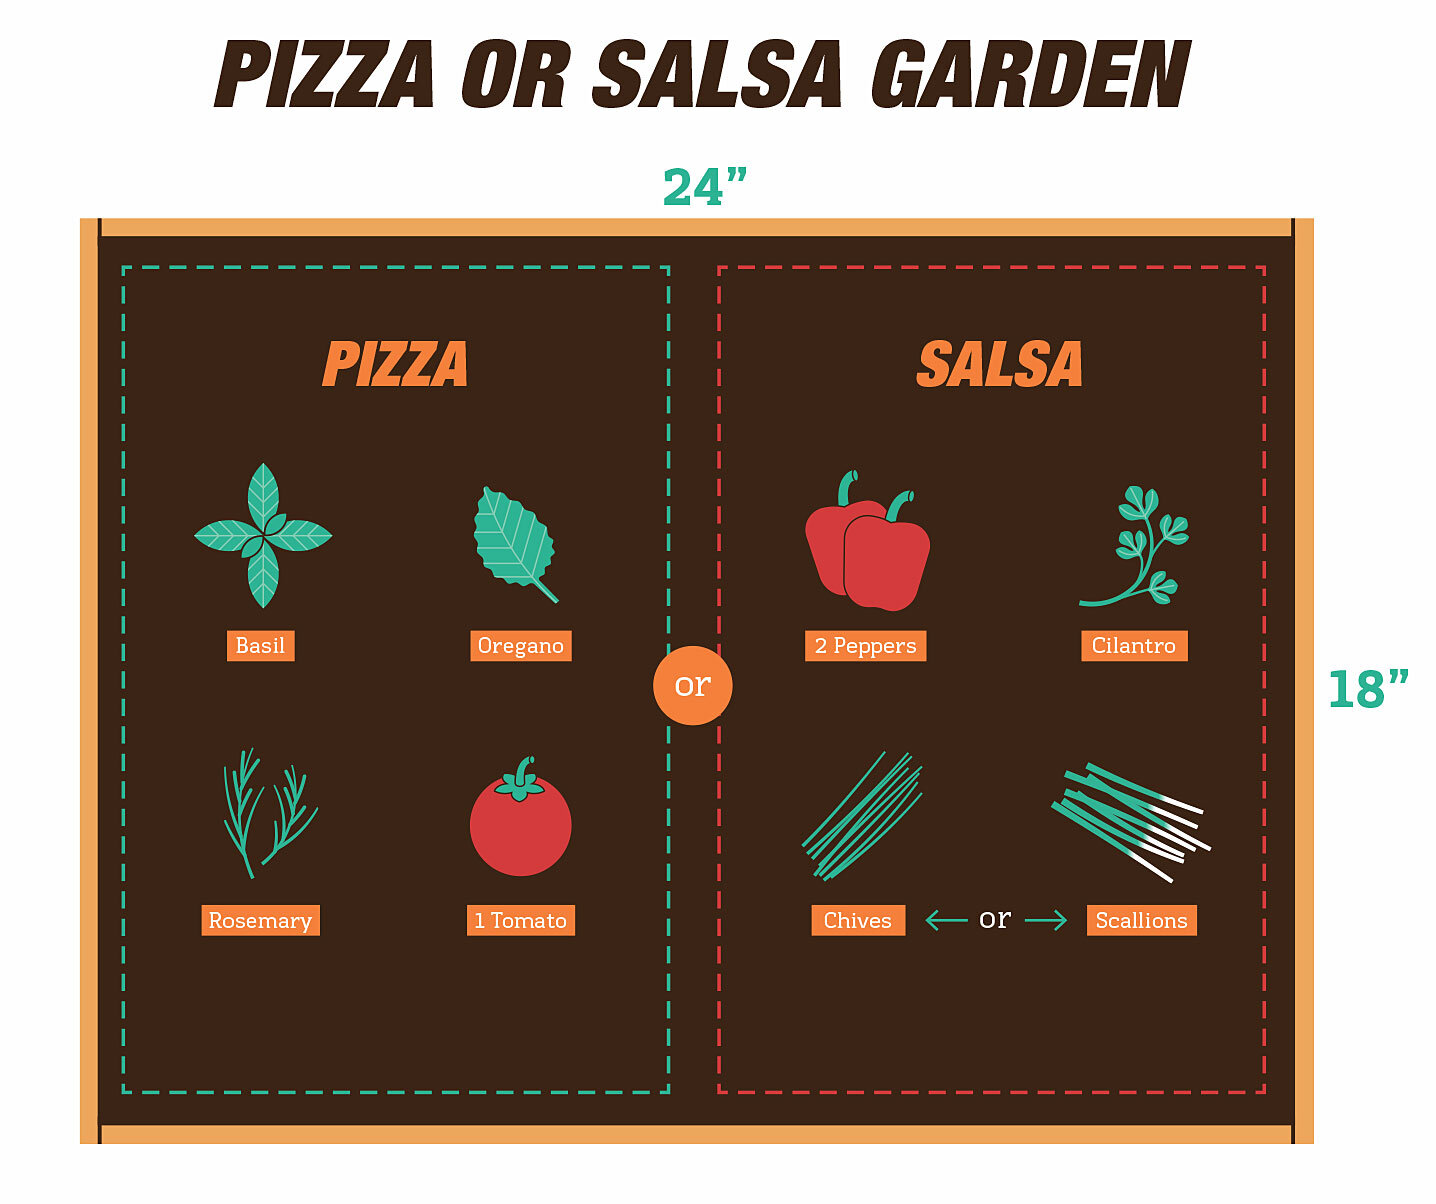
In the 24-by-18-inch planter, you have a little more room to play around. Feel free to mix and match veggies and herbs according to your taste, making sure they’re spaced out per the directions on your seed packets or the tag that comes with your plant starts. Get creative here! You could plant parsley, basil, and scallions with peppers to make a pizza or salsa garden. Or mix lettuce in with carrots and radishes for a salad bar garden.
For inspiration, we've put together a few examples of routes you could take in your own boxes below (you can also download a printable version).

Step 3: Water and watch your edible garden thrive
When you’ve finished planting, be sure to water your container. It’s best to water slowly and deeply with less frequency, rather than dumping a small amount of water in the pot every other day. Water your planter box garden slowly until water begins seeping out the drainage holes. Make sure your container is on risers so the water has a place to drain. Let the first inch or two of dirt dry out completely before you water again. Watering slowly and deeply in this manner allows the moisture to reach the roots, rather than only moisten the top of the soil.
The exception is when sowing seeds and watering tiny plant babies. After sowing seeds, keep the surface of the soil lightly moist at all times—if seeds dry out they won’t germinate. You don’t need to soak all of the soil yet because there are minimal roots until the plants begin to grow a bit larger. Once the plants are up and growing, begin soaking the soil as detailed above.
Step 4: Harvest your hard work
You can plant your larger container in a way that allows you to harvest annual vegetables all season long. For example, you could plant quick-growing veggies like radishes in early spring, then harvest them right around the time you want to plant a pepper in May.
Veggies like lettuce can also be a good shorter-term option because they grow so quickly. To harvest lettuce, pick individual leaves or cut the whole plant about an inch above the bottom, and it will regrow on its own over and over. When you’re finished and want to plant something else, simply pull it out and eat it. You can then plant something else in its place.
When you take that first bite out of a freshly-picked radish or tomato, you’ll discover another gardening benefit: flavor! If you’ve ever grown your own strawberries or green beans, you know they just taste so much better than what you can get at the store.
Whether you’re just getting started or you’re an experienced gardener, these edible container gardens can help you make the most of your outdoor space—whether that’s a backyard with spotty sun or an apartment patio.
We’ve partnered with Dunn DIY on other great garden projects, like How to Build a Juniper Raised Bed, Growing Strawberries in the PNW (and how to build a strawberry planter, too!), Plants That Attract Pollinators in the PNW, How to Make a DIY Cocktail Herb Garden, and How to Build a DIY Garden Trellis.