
Now that you’ve picked out some gorgeous plants to begin your escapade into the Mysterious World of Gardening, the first big question arises: “How do I properly plant these to give them a good, healthy start?”
While not quite as simple as the old joke, “green side up,” proper planting is fairly straightforward, driven by common-sense steps to get the roots into healthy soil and foster an effective watering routine. The steps described here focus on planting trees and shrubs but are essentially the same for anything being planted in the ground, including smaller perennials and annuals.
Here’s our illustration to show the process step by step. You can download a PDF of it here. For the details of each step, read on.
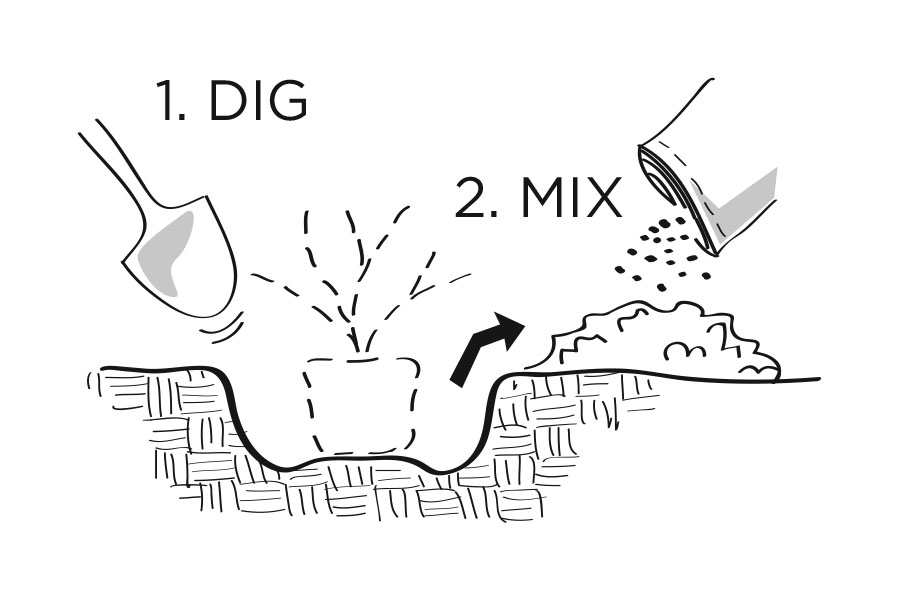
Step 1: Dig
Dig the planting hole as deep as the existing rootball (the pot size or clump of soil surrounding the roots), and at least twice as wide. Pile the soil nearby on a tarp or the ground, where it’s not harming existing plants. Loosen the soil on the sides of the hole with a shovel or spade fork, especially if your soil is heavy or dense. Some of our local soil is quite compacted and rocky (thanks a lot, glaciers). Patient, methodical digging is better than brute strength here. If you encounter a lot of rocks, there’s no need to remove them all, but you can set the largest ones aside and work the smaller ones back in when you refill.
Step 2: Mix in Soil Amendments
Mix up to 25% compost or another soil amendment thoroughly into your soil pile. This improves the soil’s ability to hold moisture and air pores. Some native soils are light and “fluffy” with organic matter and need very little amending. But even heavier soils should not be amended by more than 25% — anything more might hinder roots’ ability to adapt to your native soil.
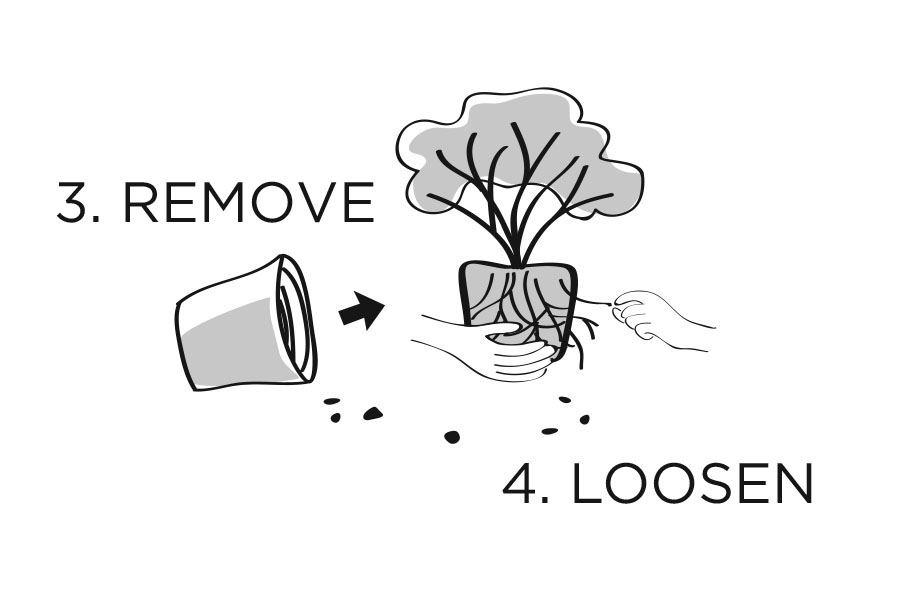
Step 3: Remove Plant from Pot
If your plant came in a pot, lay it on its side and gently remove the rootball from it. If the trunk or stem seems especially fragile or loose, take extra care when working the roots out of the pot. If the rootball is stuck in the pot, try to loosen around its edges with a trowel or knife. Fiber containers or some lightweight plastic can be cut open and peeled away.
If you purchased your plant in a form other than a pot, such as “ball & burlap” or “bare root” (not available from Swansons but other sources in late winter or spring) most of the planting process is the same, but there are slight differences, which we explain further here.
Step 4: Loosen the Roots
Loosen the roots slightly to encourage their growth into the soil. If the roots are still soft and fibrous, this can be done by crumbling away an inch or so of the container soil from around the outside of the ball and teasing the roots out. If the soil and ball are already loose and falling apart, just go ahead and put them into the ground right away. If the plant is rootbound — having a tight circle or mat of roots, you can break them up by slicing into the lower portion of the rootball with a spade or knife. Then tease them out the same way.
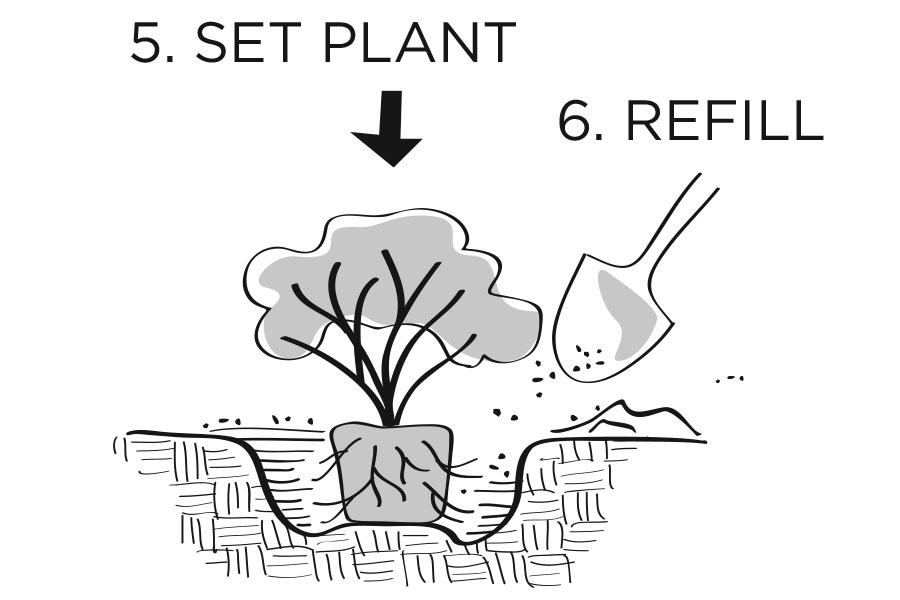
Step 5: Plant Your Tree or Shrub
Set the plant in the planting hole and check its height. Try to set it so that the base of the trunk is at or slightly higher than the surrounding soil level. You might want to allow for a little settling after planting and watering. Also you can rotate it if there is any obvious better-looking side.
Step 6: Refill Your Hole
Refill (or “backfill”) the planting hole and cover the rootball with native soil (dug from the hole) that has been amended with 20% planting compost or Soil Building Conditioner. It’s good to mix the amended soil with native soil along the sides of the planting hole as much as possible. You can tamp the soil down very lightly but your initial watering should do that for you. Build up a ring of soil at the edge of the planting hole to form a saucer to catch surface water over the root zone. If you are planting on a slope, you might need to make the saucer more prominent.
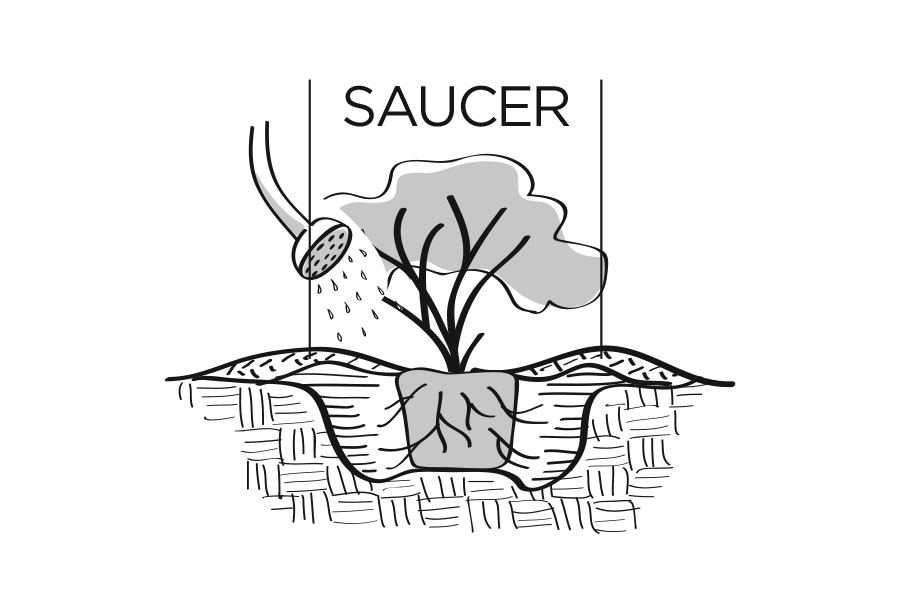
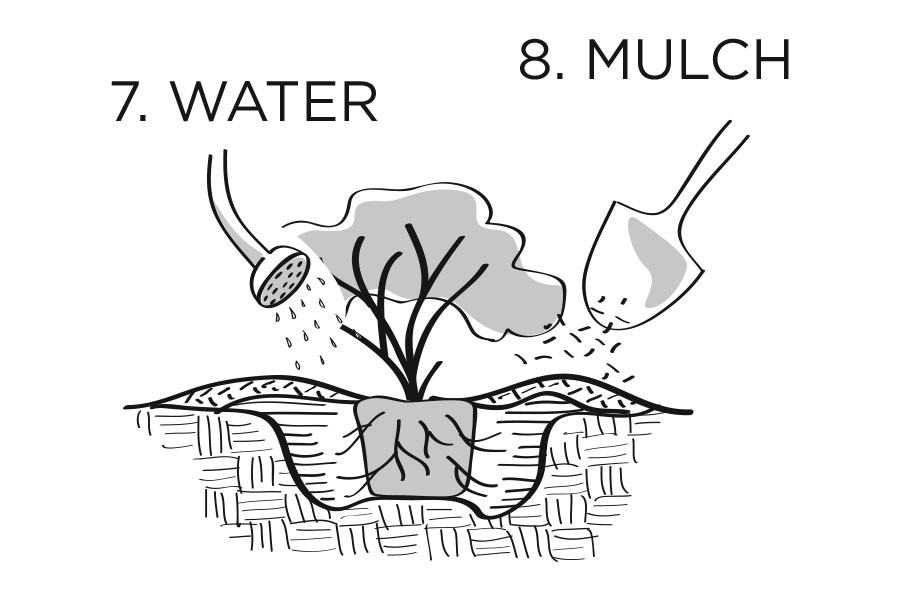
Step 7: Water
Water slowly and deeply to thoroughly soak both the full depth of the rootball and the surrounding, refilled soil. Newly planted trees and shrubs (even drought-tolerant types) should be deeply and regularly watered for at least two full years (even winters, if they’re abnormally dry). If you have an irrigation system, make sure it’s delivering water to thoroughly soak the root zones of every plant. Allow the soil surface to dry before the next deep watering — roots need a rhythm of water and oxygen.
Your watering routine for the first two years is key to your plant’s future health. Deep watering encourages deep root growth, which will promote drought tolerance, deep nutrient uptake, and stability, as well as discourage root rot from developing. Poor watering practices (shallow, insufficient, or too frequent) are the #1 cause of death and decline in woody plants. Learn more about good watering practices.
Step 8: Mulch
Mulch an area extending around the base of the plant with compost or leaves. A mulch layer 2-4 inches thick will help hold in soil moisture, keep down weeds, and protect the trunk from damage. To avoid crown rot, keep the mulch about 3-4 inches (for smaller plants) or 6-8 inches (for larger shrubs & trees) away from direct contact with the trunk.

Mission accomplished: a well-planted tree to thrive for generations!
Follow-up options:
You might consider staking a young tree (for not longer than a year or two) if it shows susceptibility to wind or other damage, particularly in an exposed area such as a parking strip. Secure it loosely — the tree should be able to move freely in most winds but not blow over in a storm.
Prune only to remove dead or broken branches, or to train the direction of growth, but don’t be too aggressive. Check trees annually for pruning needs.
You can find a lot more gardening help in our NW Gardening Tips section. And you can always ask us questions via email or in person!